Gmail makes handling multiple email accounts easy and is a great tool for condensing all of your accounts into one location so that you don’t have to check multiple URLs. Below is a detailed tutorial on how to import a new email address into your existing Gmail account, and how to send messages from Gmail marked as coming from a non-Gmail address.
How to Import a New Email Address to your Gmail Account
1. Open Gmail, and click the cog icon in top right of the screen and select Settings from the drop-down menu.

2. In your Gmail settings, go to the Accounts and Import tab. Under the header Check mail using POP3 click Add a POP3 mail account you own.

3. A pop-up window will appear. Fill in your email address and click Next Step.

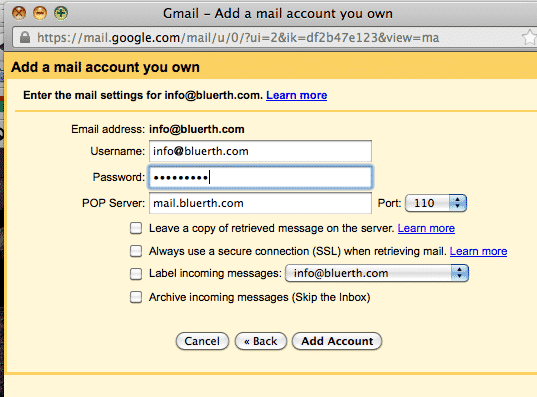
4. Add your password, POP server address (usually “mail.[yourdomain].com” but you can email your web host if you’re not sure), check the boxes that apply, and click Add Account. In this step, consider if you want all incoming message from this account to be marked as such in your inbox. Activating this feature will make it easier for you to tell where each email is coming from. **Note: In the box requesting username, it is important to include the FULL email address.

The pop-up window will disappear and you will see the new email address in your queue of imported addresses with the message that it is checking for mail to import. The import may take a while, especially if there are a lot of messages to read. You’re all set, and new mail coming into this account should now also show up in your Gmail inbox.

How to Send Mail through Gmail from an Imported Email Address
Now that you have imported your email account into Gmail, you will probably also want the ability to send email from Gmail but make it look as though it is coming from your custom email address. In order to do this, you’ll need to add this address in your settings.
1. On the ‘Account & Imports’ page again, click Add another email address you own.
2. In the pop-up box that appears, enter the display name and the email address that you wish to add.

3. Select the box that applies (As it states here, it is much easier to send email through Google servers than specifying your own server details).

4. Google will ask to verify your ownership of this account by sending an email with a security code that you can then enter into the next screen.


After you verify your ownership of the email address you wish to use, you will see it appear in your queue of addresses. Notice to the right that you can select an address as your default, which means that all sent email will look as if it’s coming from this address unless otherwise specified.


